How to install Adobe AIR Runtime on the Android Emulator
I am going to share how to install Adobe AIR Runtime on your Android Emulator. First of all, you ensure to install Android SDK. I’ve done and the version I downloaded is “installer_r08-windows.exe (Recommended)”. I can’t wait to share it to you. Get started.
Step 1) Use Command Prompt change the folder
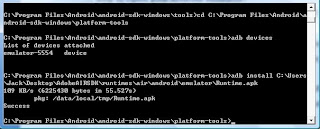
After you install it, you click “Start” to open “Command Prompt” to change folder to “platform-tools of Android”. In my case, this folder is on the path(“C:\Program Files\Android\android-sdk-windows\platform-tools”) of my laptop.
Step 2) download and unzip Adobe AIR Runtime
You can go to Adobe website(http://www.adobe.com/products/air/sdk/) to download Adobe AIR Runtime. I did and put it on my laptop. You can find the “Runtime.apk” on the path (C:\Users\Jack\Desktop\AdobeAIRSDK\runtimes\air\android\emulator\).
Step 3) Open your Android emulator
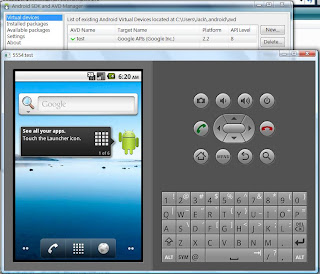
You open your Android emulator you already NEW and keep it on as bellow.
Step 4) Type install apk command
Now, you could type install apk command on your command prompt. The command is “adb install pathofRuntime\Runtime.apk”. In my case, the command is going to be “adb install C:\Users\Jack\Desktop\AdobeAIRSDK\runtimes\air\android\emulator\Runtime.apk”. After that, wait could minutes, you will see the successes message that means Adobe AIR Runtime is installed on you android emulator. Step 5) Check it out on your emulator
You can take a look if AIR Runtime really is installed. You can see what I’ve done as below.


0 comments