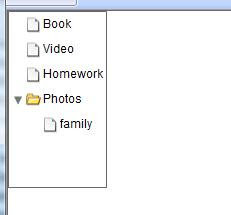
The Tree component is used to represent a hierarchical data set, providing an interface for the user to drill down through the hierarchy in order to select an atomic element as below:
 When using XML as the data source for a Tree, you should use the labelField property to identify what in the data source should be used for the label. The XML data source is being defined inline and has generic element names. But its tag attributes, referred to using @tag, will be used as the labels in the Tree. You can follow the source code I share to see what happen. Another important property is showRoot. In the following code, you couldn’t see the “ROOT” of tree, because I set showRoot=false. (If you don’t like it, you can delete it. The default value of showRoot is true). I hope you enjoy this short article and have fun with flex 4.
Source code:
<?xml version="1.0" encoding="utf-8"?>

<s:Application xmlns:fx="http://ns.adobe.com/mxml/2009"

   xmlns:s="library://ns.adobe.com/flex/spark"

   xmlns:mx="library://ns.adobe.com/flex/mx" minWidth="955" minHeight="600">

<fx:Declarations>

<!-- Place non-visual elements (e.g., services, value objects) here -->

</fx:Declarations>


<mx:Tree labelField="@tag" showRoot="false">

<mx:dataProvider>

<fx:XML>

<note tag="My File">

<note tag="Book"/>

<note tag="Video"/>

<note tag="Homework"/>

<note tag="Photos">

<note tag="family"/>

</note>

</note>

</fx:XML>

</mx:dataProvider>

</mx:Tree>

</s:Application>
Hello! This article is talking about how to write ActionScript in your flex application. There are two ways to write ActionScript in a Flex application. First option is putting ActionScript code within MXML file. This is quite common when handling events. But this approach is best for short pieces of ActionScript. You can place it within Script tags as below:
<fx:Script>
<! [CDATA[
// ActionScript goes here!
]]>
</fx:Script>
Note that Script is defined within the Flex Core components namespace, fx. This namespace isn’t used in the first two chapters, although Flash Builder adds fx:Declarations tags to the default MXML file.
Also, you should surround your code with the <![CDATA[ and ]]> tags Because the MXML file is XML, many characters commonly found within ActionScript will be invalid when the XML interpreter looks at the page. By wrapping the ActionScript within those tags, the ActionScript code will be ignored by the XML interpreter.
A second way to add ActionScript to a Flex application is to store it in a separate text file. There are two primary benefits to going this route and I really recommend this way. First, it makes it easier to navigate and develop your application, with content in multiple files, saving you from searching through increasingly large and complex MXML documents for any particular code.
The second benefit is that once you’ve separated some ActionScript into another file, you can easily reuse it in other projects. Although it’s considered to be a best practice to write your ActionScript in a separate file, most of the examples in many books you read will not do so, because for the sake of simplicity.A separate ActionScript file can then be included by, or imported into, the MXML document. From a functional standpoint, including an ActionScript file has the same effect as if the code were inserted directly into the MXML. So, up to you which way you want to choose to develop your flex projects. I hope you will enjoy coding and have more fun.
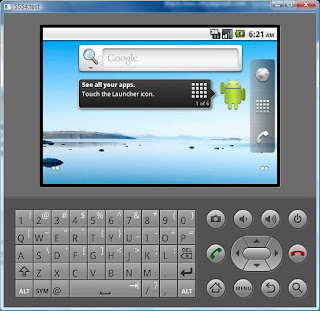
Do you know that you can rotate your Android emulator? I am going to tell you how. In order To rotate the Android Emulator, you have to disable the Num Lock key and and use the 7 and the 9 in the num pad to rotate the emulator and change its layout from portrait to landscape.
If you are working on a laptop you can do the same thing by pressing Fn(Function)+7 or Fn+9.

This video is from Adobe. It is good for beginner to have a overview of flex and flash builder. Learn about the basics of using Flex and Flash Builder, including setting up Flash Builder, building data-driven Flex applications, and organizing visual elements and code. In this episode of the Flex in a Week training series, you will learn which technologies make up the Adobe Flash Platform.
Enjoy coding and have more fun.
Hello, I found this nice toturial for creating Httpservice with adobe flash builder CS5. It is really easy to learn more. I tried it. It works very well. I hope you are doing well. Enjoy coding and fun.
I am going to share how to install Adobe AIR Runtime on your Android Emulator. First of all, you ensure to install Android SDK. I’ve done and the version I downloaded is “installer_r08-windows.exe (Recommended)”. I can’t wait to share it to you. Get started.
Step 1) Use Command Prompt change the folder
After you install it, you click “Start” to open “Command Prompt” to change folder to “platform-tools of Android”. In my case, this folder is on the path(“C:\Program Files\Android\android-sdk-windows\platform-tools”) of my laptop.
Step 2) download and unzip Adobe AIR Runtime
You can go to Adobe website(http://www.adobe.com/products/air/sdk/) to download Adobe AIR Runtime. I did and put it on my laptop. You can find the “Runtime.apk” on the path (C:\Users\Jack\Desktop\AdobeAIRSDK\runtimes\air\android\emulator\).
Step 3) Open your Android emulator
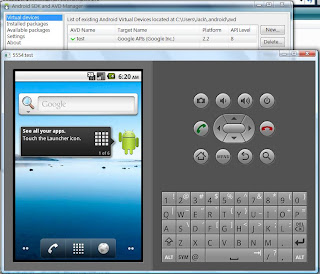
You open your Android emulator you already NEW and keep it on as bellow.

Step 4) Type install apk command
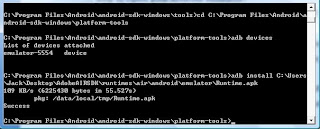
Now, you could type install apk command on your command prompt. The command is “adb install pathofRuntime\Runtime.apk”. In my case, the command is going to be “adb install C:\Users\Jack\Desktop\AdobeAIRSDK\runtimes\air\android\emulator\Runtime.apk”. After that, wait could minutes, you will see the successes message that means Adobe AIR Runtime is installed on you android emulator.
 Step 5) Check it out on your emulator
You can take a look if AIR Runtime really is installed. You can see what I’ve done as below.
Step 1) Use Command Prompt change the folder
After you install it, you click “Start” to open “Command Prompt” to change folder to “platform-tools of Android”. In my case, this folder is on the path(“C:\Program Files\Android\android-sdk-windows\platform-tools”) of my laptop.
Step 2) download and unzip Adobe AIR Runtime
You can go to Adobe website(http://www.adobe.com/products/air/sdk/) to download Adobe AIR Runtime. I did and put it on my laptop. You can find the “Runtime.apk” on the path (C:\Users\Jack\Desktop\AdobeAIRSDK\runtimes\air\android\emulator\).
Step 3) Open your Android emulator
You open your Android emulator you already NEW and keep it on as bellow.

Step 4) Type install apk command
Now, you could type install apk command on your command prompt. The command is “adb install pathofRuntime\Runtime.apk”. In my case, the command is going to be “adb install C:\Users\Jack\Desktop\AdobeAIRSDK\runtimes\air\android\emulator\Runtime.apk”. After that, wait could minutes, you will see the successes message that means Adobe AIR Runtime is installed on you android emulator.
 Step 5) Check it out on your emulator
You can take a look if AIR Runtime really is installed. You can see what I’ve done as below.
It might take time to do and be patient. It is really interesting for me. I feel excited to learn how to create android application with flash IDE. I hope you enjoy it as well. If you have any ideas or questions, please feel free to let me know. Thank you so much.
If you want to develop AIR Application on Android with Adobe powerful software, you need to read this article. This article is good for beginner. When you start to build your Android application, you have to build a developing environment first. So I am going to tell you what you need to establish your environment. Here we go.
I’d like use flash-base software to develop AIR Application. We divide into three parts:
Step 1) Java SDK
First of all, you have to download Java SDK (http://www.oracle.com/technetwork/java/javase/downloads/index.html) and install it. If you’ve done this, you can skip this step.
I’d like use flash-base software to develop AIR Application. We divide into three parts:
Step 1) Java SDK
First of all, you have to download Java SDK (http://www.oracle.com/technetwork/java/javase/downloads/index.html) and install it. If you’ve done this, you can skip this step.
Step 2) Android Part
Of course, you need Android SDK. The Android SDK includes a mobile device emulator -- a virtual mobile device that runs on your computer. The emulator lets you prototype, develop, and test Android applications without using a physical device. You just download and install Android SDK; you can “New” your virtual Android device on your laptop or PC. Here is the URL(http://developer.android.com/sdk/index.html).
Step 3) Flash Builder or Flash CS5 Pro
If you choose flash-based software to develop Android applications, so you can download the Adobe Flash Builder (trial version) or Adobe Flash CS5 Pro (Trail version). Both are using ActionScript language to create application. ActionScript 3 is an implementation of ECMAScript, which is very similar to JavaScript. Flash Proefssional provides vector-based graphics rendering, along with native audio and video capabilities, and uses the ActionScript language to add interactivity to websites leveraging Flash Player. Flash Builder 4 (formerly Flex Builder) is an Eclipse-based IDE with support for application debugging and profiling. If you choose either one, you don’t need to install “Flex 4 SDK”, otherwise, you have to do. This is the way I am doing. You can different developing software. That is ok.
This is a short article for beginner like me. If I have something new, I will share for you. I hope you enjoy it. Have fun. Thank you!


